k8s Sample Controller源码阅读
k8s Sample Controller源码阅读总结
架构图
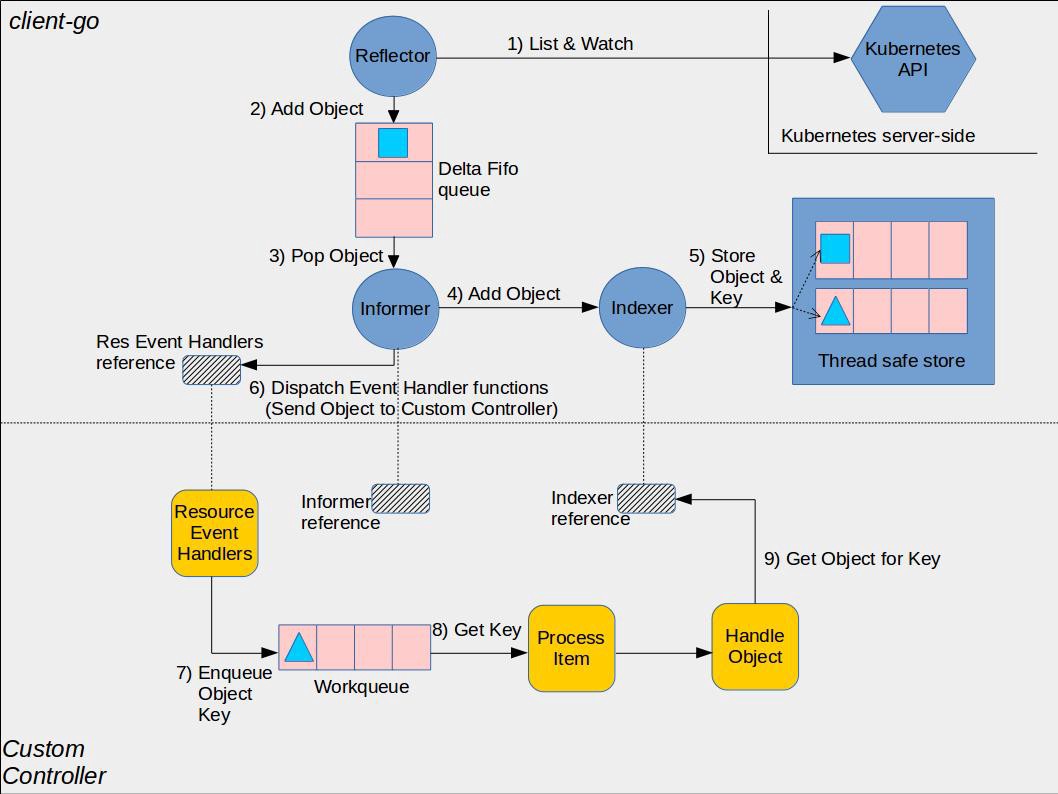
Informer
WorkQueue
由于chan的功能比较单一,例如无法限制队列的写入速度,因此k8s的团队又构建了WorkQueue来作为goroutine间通讯的手段
通用队列
数据结构以及接口定义:
// Queue的Interface
type Interface interface {
// 添加对象
Add(item interface{})
// 队列长度
Len() int
// 获取对象,shutdown表示队列是否已经关闭了
Get() (item interface{}, shutdown bool)
// 告知队列对象已经处理完成,可以Pop了
Done(item interface{})
// 关闭队列
ShutDown()
// 队列是否正在关闭
ShuttingDown() bool
}
// Type is a work queue (see the package comment).
type Type struct {
// 队列存储数据结构,是一个数组
queue []t

// dirty这个集合包含了所有需要被操作的对象
dirty set

// 正在进行操作的对象的集合
processing set

// 信号量,条件同步
cond *sync.Cond

// 正在关闭标志
shuttingDown bool

// 监控用
metrics queueMetrics

// 更新没有完成的任务的周期,监控用
unfinishedWorkUpdatePeriod time.Duration
// 时钟
clock                      clock.Clock
}

// 空类型
type empty struct{}
// 伪范型2333
type t interface{}
// 集合的实现
type set map[t]empty
方法:
// 创建一个默认的队列
func New() *Type
// 创建一个有名字的队列
func NewNamed(name string) *Type
// 创建一个新的队列的实际执行函数
func newQueue(c clock.Clock, metrics queueMetrics, updatePeriod time.Duration) *Type
// 判断集合中是否含有对象t
func (s set) has(item t) bool
// 添加一个对象到集合
func (s set) insert(item t)
// 从集合中删除一个对象
func (s set) delete(item t)
// 添加一个对象到队列
// 先添加到dirty集合中
// 然后添加到queue中,
// 中间如果dirty/processing中已经存在,则返回
func (q *Type) Add(item interface{})
// 返回队列长度,即queue的长度
func (q *Type) Len() int
// pop queue的第一个元素,并添加到processing集合中
func (q *Type) Get() (item interface{}, shutdown bool)
// 通知某个对象被处理晚了,将对象从processing中移除,如果在dirty中
// 仍然存在该对象,说明该对象又一次变更了,所以需要再次添加到队列中
func (q *Type) Done(item interface{})
// 关闭队列
func (q *Type) ShutDown()
// 判断队列是否正在关闭
func (q *Type) ShuttingDown() bool
// 更新队列中没有完成的任务,监控使用
func (q *Type) updateUnfinishedWorkLoop()
client-go中的队列设计的很有意思,分为三个存储,分别是队列queue, 产生变化的对象集合dirty和正在被处理的对象集合processing,由于queue那边的接收端有 可能有多个处理进程,为了防止同一个对象的多个变更被不同处理进程进处理导致的冲突问题,因此采用这种方式,保证对象在processing的集合中的时候,不会有该对象的另一个变更加入到队列之中。
延时队列
数据结构与接口定义:
// DelayingInterface是一种可以在添加一个对象前先等待一段时间的队列,这样
// 在对象处理失败,再次添加进队列的过程不会变成一个占用大量计算资源的无限循环
type DelayingInterface interface {
Interface
// 在等待duration之后,添加对象到队列
AddAfter(item interface{}, duration time.Duration)
}
// deplayingType包装了基本队列接口,并且提供了延时重新入队的实现
type delayingType struct {
Interface

// 时钟,用来确认延时执行的时机
clock clock.Clock

// 用于接收关闭的信号
stopCh chan struct{}
// 保证shutdown信号只被处理一次
stopOnce sync.Once

// 定时器,确保等待时间不超过maxWait
heartbeat clock.Ticker

// 等待添加元素的队列
waitingForAddCh chan *waitFor

// 重试次数的监控
metrics retryMetrics
}

// 保存对象和它应该被添加进队列的时机
type waitFor struct {
data    t
readyAt time.Time
// index in the priority queue (heap)
// 对象位于优先队列的索引
index int
}
// waitForPriorityQueue implements a priority queue for waitFor items.
//
// waitForPriorityQueue implements heap.Interface. The item occurring next in
// time (i.e., the item with the smallest readyAt) is at the root (index 0).
// Peek returns this minimum item at index 0. Pop returns the minimum item after
// it has been removed from the queue and placed at index Len()-1 by
// container/heap. Push adds an item at index Len(), and container/heap
// percolates it into the correct location.
// waitFor的优先队列,以readyAt的值小出队,实现了heap.Interface,从index 0出队,index Len()入队,
// 然后由heap操作保证正确顺序
type waitForPriorityQueue []*waitFor
方法定义如下:
// 创建一个匿名的延时队列
func NewDelayingQueue() DelayingInterface
// 创建一个有名字的延时队列
func NewNamedDelayingQueue(name string) DelayingInterface
// 创建一个延时队列,并启动waitingloop,创建延时队列的实际函数
func newDelayingQueue(clock clock.Clock, name string) DelayingInterface
// 返回优先队列长度
func (pq waitForPriorityQueue) Len() int
// 返回i和j的比较值,这里比较的是他们的readyAt值谁更小
func (pq waitForPriorityQueue) Less(i, j int) bool
// 交换i和j
func (pq waitForPriorityQueue) Swap(i, j int)
// 添加x到队尾
func (pq *waitForPriorityQueue) Push(x interface{})
// 从队列首抛出第一个对象
func (pq *waitForPriorityQueue) Pop() interface{}
// 获取队列首的对象,但是不从队列中移除
func (pq waitForPriorityQueue) Peek() interface{}
// 关闭队列
func (q *delayingType) ShutDown()
// 向waitingForAddCh添加一个waitFor对象
func (q *delayingType) AddAfter(item interface{}, duration time.Duration)
// waitingLoop在队列关闭之前,持续从队列中检查可以添加的对象
//  * 通过waitingEntryByData来避免重复添加,而改成更新readAt
func (q *delayingType) waitingLoop()
// 添加对象到队列,如果对象已经存在,就更新其readAt
func insert(q *waitForPriorityQueue, knownEntries map[t]*waitFor, entry *waitFor)

限速队列
接口以及数据结构定义:
// RateLimitingInterface is an interface that rate limits items being added to the queue.
// 限速队列的Interface
type RateLimitingInterface interface {
DelayingInterface

// 以特定速度限制添加对象到队列,依赖特定的限速器进行判断
AddRateLimited(item interface{})

// 让限速器放弃重试某个元素。开发者对这个元素进行Done操作不受影响
Forget(item interface{})

// 返回某个对象被重新入队多少次,监控用
NumRequeues(item interface{}) int
}
// 限速队列的实现,由一个限速器和延时队列组成
type rateLimitingType struct {
DelayingInterface

rateLimiter RateLimiter
}

// 限速器接口,是限速队列的核心实现
type RateLimiter interface {
// 确认一个对象被添加前应该等待多久
When(item interface{}) time.Duration
// 放弃追踪一个对象
Forget(item interface{})
// 返回某个对象被重新入队多少次,监控用
NumRequeues(item interface{}) int
}

// 固定速率(qps)的限速器
type BucketRateLimiter struct {
*rate.Limiter
}

// 一种常用限速器,当对象处理失败的时候,其再次入队的等待时间 × 2,到MaxDelay为止
// 直到超过最大失败次数
type ItemExponentialFailureRateLimiter struct {
// 修改失败次数用到的锁
failuresLock sync.Mutex
failures     map[interface{}]int

baseDelay time.Duration
maxDelay  time.Duration
}

// 快慢限速器,对于一次对象,先以fastDelay为周期进行尝试,超过maxFastAttempts次数后,按照slowDelay为周期进行尝试
type ItemFastSlowRateLimiter struct {
failuresLock sync.Mutex
failures     map[interface{}]int

maxFastAttempts int
fastDelay       time.Duration
slowDelay       time.Duration
}

// MaxOfRateLimiter calls every RateLimiter and returns the worst case response
// When used with a token bucket limiter, the burst could be apparently exceeded in cases where particular items
// were separately delayed a longer time.
// 符合速率限制器,选择多个所有限速器中速度最慢的一种方案
type MaxOfRateLimiter struct {
limiters []RateLimiter
}
方法定义如下:
// 创建一个匿名的限速队列
func NewRateLimitingQueue(rateLimiter RateLimiter) RateLimitingInterface
// 创建一个有名字的限速队列
func NewNamedRateLimitingQueue(rateLimiter RateLimiter, name string) RateLimitingInterface
// AddRateLimited AddAfter's the item based on the time when the rate limiter says it's ok
// 添加一个元素到限速队列中,本质上是调用延时队列的接口,然后由限速器when接口来判断应该延迟多久
func (q *rateLimitingType) AddRateLimited(item interface{})
// 返回该对象的请求数量
func (q *rateLimitingType) NumRequeues(item interface{}) int
// 放弃追中一个对象
func (q *rateLimitingType) Forget(item interface{})

// 创建一个默认的限速器,由ItemExponentialFailureRateLimiter和
// BucketRateLimiter组成的复合限速器
func DefaultControllerRateLimiter() RateLimiter
// BucketRateLimiter的when实现
// 通过rate.Limiter.Reserve().Delay()获取延迟的周期
func (r *BucketRateLimiter) When(item interface{}) time.Duration
// 固定频率,不需要重试
func (r *BucketRateLimiter) NumRequeues(item interface{}) int
// 不需要重试,因此也不需要忘记
func (r *BucketRateLimiter) Forget(item interface{})
// 创建一个新的ItemExponentialFailureRateLimiter
func NewItemExponentialFailureRateLimiter(baseDelay time.Duration, maxDelay time.Duration) RateLimiter
// 默认的对象限速器,基础是每微秒重试1次,最长为1000s
func DefaultItemBasedRateLimiter() RateLimiter
// 根据失败次数,时间间隔将会不断翻倍,这里要注意判断是否超过MaxInt64造成溢出
func (r *ItemExponentialFailureRateLimiter) When(item interface{}) time.Duration
// 返回重试次数,即failure[item]
func (r *ItemExponentialFailureRateLimiter) NumRequeues(item interface{}) int
// 放弃追踪对象,情况failure中的信息
func (r *ItemExponentialFailureRateLimiter) Forget(item interface{})
// 创建一个新的快慢限速器
func NewItemFastSlowRateLimiter(fastDelay, slowDelay time.Duration, maxFastAttempts int) RateLimiter
// 根据failture[item]中的情况,返回fastDelay或者slowDelay
func (r *ItemFastSlowRateLimiter) When(item interface{}) time.Duration
// 返回failture中的记录,即重试次数
func (r *ItemFastSlowRateLimiter) NumRequeues(item interface{}) int
// 放弃追踪一个对象,清除failure中的记录
func (r *ItemFastSlowRateLimiter) Forget(item interface{})
// 遍历所有的限速器,选择周期最长的那一个
func (r *MaxOfRateLimiter) When(item interface{}) time.Duration
// 创建一个新的限速器
func NewMaxOfRateLimiter(limiters ...RateLimiter) RateLimiter
// 返回所有限速器中重试次数最多的那个
func (r *MaxOfRateLimiter) NumRequeues(item interface{}) int
// 调用所有Limiter,放弃追踪一个对象
func (r *MaxOfRateLimiter) Forget(item interface{})
限速队列的实现十分巧妙,延时队列 + 限速器,在添加对象到队列的时候,通过限速器返回对应的延时来实现。
Sample Controller
k8s官方提供了一个简单的k8s自定义Controller实现:https://github.com/kubernetes/sample-controller, 主要实现的是针对CRD(自定义资源)Foo进行相关操作。
代码结构
├── artifacts # crd定义和样例
├── code-of-conduct.md
├── CONTRIBUTING.md
├── controller.go # Controller定义
├── controller_test.go # 测试代码
├── docs # 文档
├── Godeps # 依赖
├── go.mod
├── go.sum
├── hack # 代码生成工具
├── LICENSE
├── main.go  # 程序入口,负责创建Controller
├── OWNERS
├── pkg # CRD的属性相关定义,中间涉及到客户端和deepcopy的部分可以用代码生成器生成
├── README.md
└── SECURITY_CONTACTS
CRD Foo
# crd.yaml
# crd 定义
apiVersion: apiextensions.k8s.io/v1beta1
kind: CustomResourceDefinition
metadata:
name: foos.samplecontroller.k8s.io
spec:
group: samplecontroller.k8s.io
version: v1alpha1
names:
kind: Foo
plural: foos
scope: Namespaced

# 带校验规则的crd定义
apiVersion: apiextensions.k8s.io/v1beta1
kind: CustomResourceDefinition
metadata:
name: foos.samplecontroller.k8s.io
spec:
group: samplecontroller.k8s.io
version: v1alpha1
names:
kind: Foo
plural: foos
scope: Namespaced
validation:
openAPIV3Schema:
properties:
spec:
properties:
replicas:
type: integer
minimum: 1
maximum: 10

# 带subresource的crd定义
apiVersion: apiextensions.k8s.io/v1beta1
kind: CustomResourceDefinition
metadata:
name: foos.samplecontroller.k8s.io
spec:
group: samplecontroller.k8s.io
version: v1alpha1
names:
kind: Foo
plural: foos
scope: Namespaced
subresources:
status: {}
main.go
main.go的逻辑主要是通过informer机制创建k8s/自定义Controller的infomer,然后根据这两个informer创建controller 并启动。
controller.go
这里存放这Controller的主逻辑,工作流程图如下:

除了之前blog中分析过的Informer和上文提到的WorkQueue之外,其中几个比较关键的组件解析如下:
ResourceEventHandler
这个是Informer的回调函数集合,其中deployment informer的逻辑是调用Controller的handleobject逻辑, 判断是否属于foo对象,如果是,就将找到的Foo对象变更消息加入workqueue。而对于Foo informer的Foo对象的变更,则是直接 加入workQueue
worker
runWorker是一个循环,判断条件是processNextWorkItem的执行结果。根据运行sample-controller指定的参数,可以同时运行多个
Worker以提高效率。而processNextWorkItem的主要逻辑是从workqueue中取出key,并调用syncHandler处理,如果处理失败,
则使用workqueue的AddAddRateLimited方法重新入队。
syncHandler
controller的主要逻辑,根据从workQueue中获取的key,调用informer的Listener查询Foo对象。然后根据Foo对象查询关联 的Deployment,并进行相应修改,如果修改成功,就更新Foo对象的状态。
CRD define
位于pkg内,包括一些客户端代码。这部分代码主要包含以下需要关注的地方:
- pkg/apis/samplecontroller/register.go 这里声明了自定义controller的GroupName
- pkg/apis/samplecontroller/v1alpha1/types.go 这里声明了Foo类型的数据格式,对应crd中yaml定义
- pkg/apis/samplecontroller/v1alpha1/register.go 这里定义了处理类型schema的接口,用于添加Foo类型到k8s的schema